How to login to the Anvil supercomputer
In the BigCare workshop we will ultimately be logging into the Anvil supercomputer using the ThinLinc client on a Windows or Mac computer. ThinLinc is a program you download and install on your computer to connect to Anvil. It is possible to install and configure ThinLinc on more than one computer if you work from multiple locations.
These instructions require that you have already created accounts at https://portal.xsede.org/, have shared your XSEDE username with the BigCare team at bigcare@purdue.edu, and they have created accounts for you on Anvil. There is a video that covers the steps used in these instructions which you may find helpful. The video must be watched anyway since it describes additional configuration steps you must take once you successfully login to Anvil.
Spacing and punctuation must exactly match what is provided below. It is easier to copy/paste the commands below than to type them from scratch. Most of the steps below must be done just once.
1: XSEDE requires 2-factor authentication, aka multi-factor authentication, aka MFA. The multi-factor authentication used is Duo Mobile. To configure Duo Mobile, follow the instructions here:
2: Connecting to Anvil requires the creation and use of an ssh key pair (just once!):
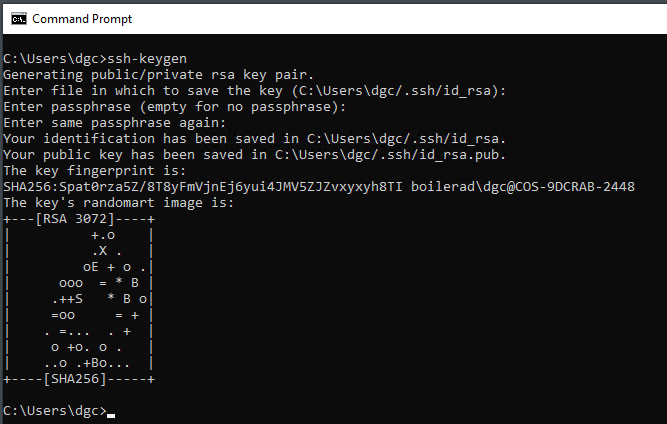
To create a new ssh key pair using Windows:
Open a command prompt by Start->Windows System->Command Prompt. Leave this command prompt open since we will use it in multiple steps. In that new command prompt window type:
ssh-keygen
It will prompt you for where to save the keys. Use the default location it offers, and press enter. If it tells you that keys already exist and asks if you want to overwrite them, don’t! You already have already created keys we can use and overwriting them may remove access to another computer system. When it asks you to enter a passphrase, just press enter without providing a passphrase (you’ll be prompted twice). It will look something like this:
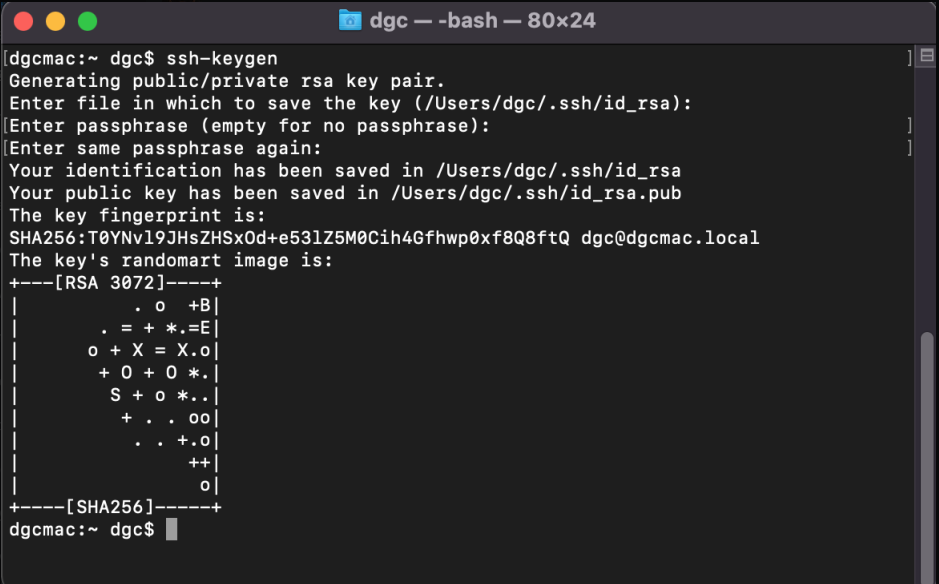
To generate a new ssh key pair on a Mac:
Open the Terminal program and leave it open since we will use it in multiple steps. In the Terminal window type “ssh-keygen”. It will prompt you for where to save the file. Use the default location it offers and remember where it is and press enter. If it tells you that keys already exist and asks if you want to overwrite them, don’t! You already have already created keys we can use and overwriting them may remove access to another computer system. If it asks you to enter a passphrase, just press enter without entering a passphrase (you’ll be prompted twice). It will look something like this:
3: Now that we have created a public/private ssh key pair, we must copy the public key to Anvil.
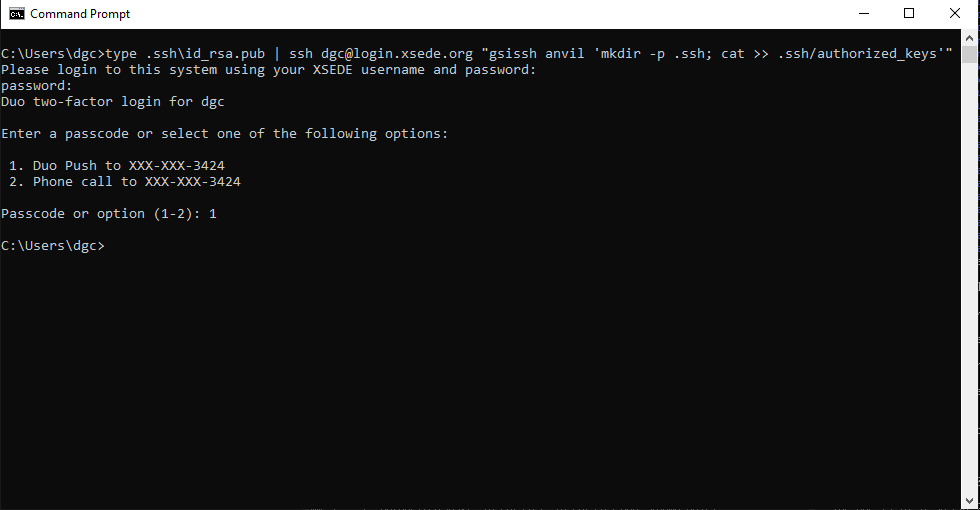
To copy our public key to Anvil using Windows:
Use the existing command prompt window or launch a new command prompt by clicking Start->Windows System->Command Prompt.
We will be making a small change to an arcane looking command and then pasting it into this command prompt (it’s one long line not two lines). Open notepad (Start->Windows Accessories->Notepad), and copy/paste this into notepad:
type .ssh\id_rsa.pub | ssh xxxxx@login.xsede.org "gsissh anvil 'mkdir -p .ssh; cat >> .ssh/authorized_keys'"
Then in the notepad window, replace the “xxxxx” with your XSEDE username (all lower case), without introducing any extra spaces. Then copy all of this text from notepad and paste it into the command prompt window. You will be prompted for your XSEDE password and then you will be prompted to authenticate using Duo Mobile (choose option 1). You will get a notification on the Duo Mobile app on your phone, and you will approve. It will look something like this:
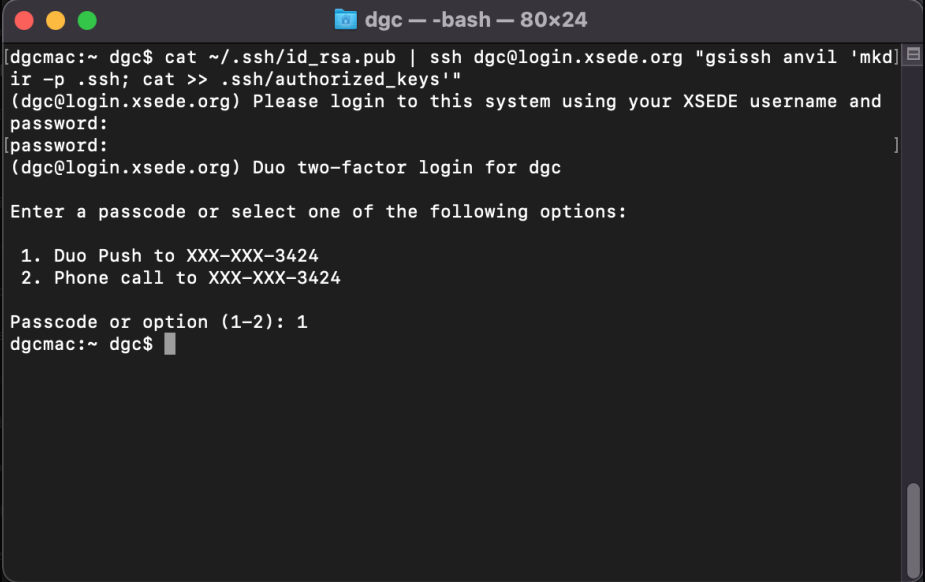
To copy our public key to Anvil using a Mac:
Open the Terminal program and copy/paste the following, being sure to change “xxxxx” to your username, and preserving all spacing and punctuation exactly. You can either paste it directly into the terminal window, then use the arrow keys on your keyboard to change the “xxxxx” to your username” or you can paste it into an editor, change the “xxxxx”, and then copy/paste from the editor to the Terminal window (it’s one long line, not two lines):
cat ~/.ssh/id_rsa.pub | ssh xxxxx@login.xsede.org "gsissh anvil 'mkdir -p .ssh; cat >> .ssh/authorized_keys'"
You will be prompted for your XSEDE password and then you will be prompted to authenticate using Duo Mobile (choose option 1). You will get a notification on the Duo Mobile app on your phone, and you will approve. It will look something like this:
4: Next we can download and install the ThinLinc client by browsing to https://www.cendio.com/thinlinc/download and selecting either the Windows or Mac installer, download the installer and run it to install the ThinLinc client.
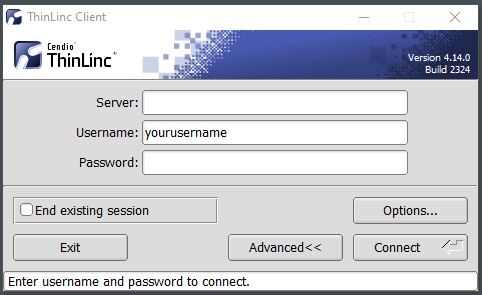
5: Launch the ThinLinc client. It will look something like this:
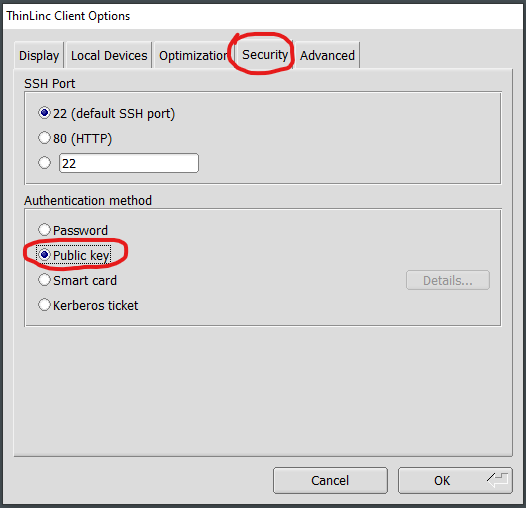
Click Options, then the Security Tab, and select Public Key and click OK.
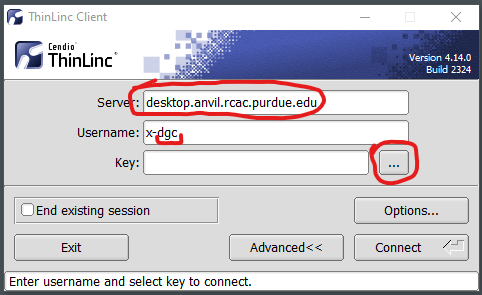
Then for the Server, enter: desktop.anvil.rcac.purdue.edu
Your Anvil username is the same as XSEDE portal username prefixed with “x-“. My XSEDE username is dgc, which means my Anvil username is “x-dgc”. Enter your Anvil username.
There is a small box with three dots next to it just to the right of the Key: field in the dialog box. Click those three dots to specify the location of our public key (named id_rsa).
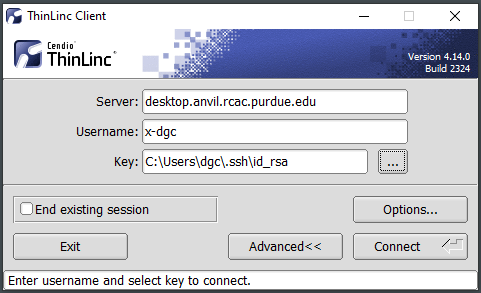
You will be prompted with a file browser to find your id_rsa file. Mine was in C:\Users\dgc\.ssh\id_rsa. Yours will be somewhere else. You can look in the command prompt windows above to find the full path. To specify mine, I will double click on C:/ then Users/ then dgc/ then .ssh/ and finally select id_rsa (NOT id_rsa.pub).
My ThinLinc client login dialog box now looks like this:
I can click Connect to login to Anvil! In the future when I launch ThinLinc, all the above information will be remembered.